62nd minute. 1-0. Corner kick for the opponent.
You’ve had hardly anything to do since halftime. Your legs are cold, your body’s in standby mode. The ball sails into the five-meter box. You take off, jump, and collide with the striker in midair. You land awkwardly. A sharp pain in your groin.
You stay in the game. On the next high ball, you’re half a step too late getting up.
Injuries in goal feel like bad luck. Most of the time, they aren’t. They occur where the body isn’t prepared for what goalkeeping demands of it: explosive jumps, hard landings, and sudden changes of direction from a standing position. That’s exactly what athleticism in goalkeeping is all about.
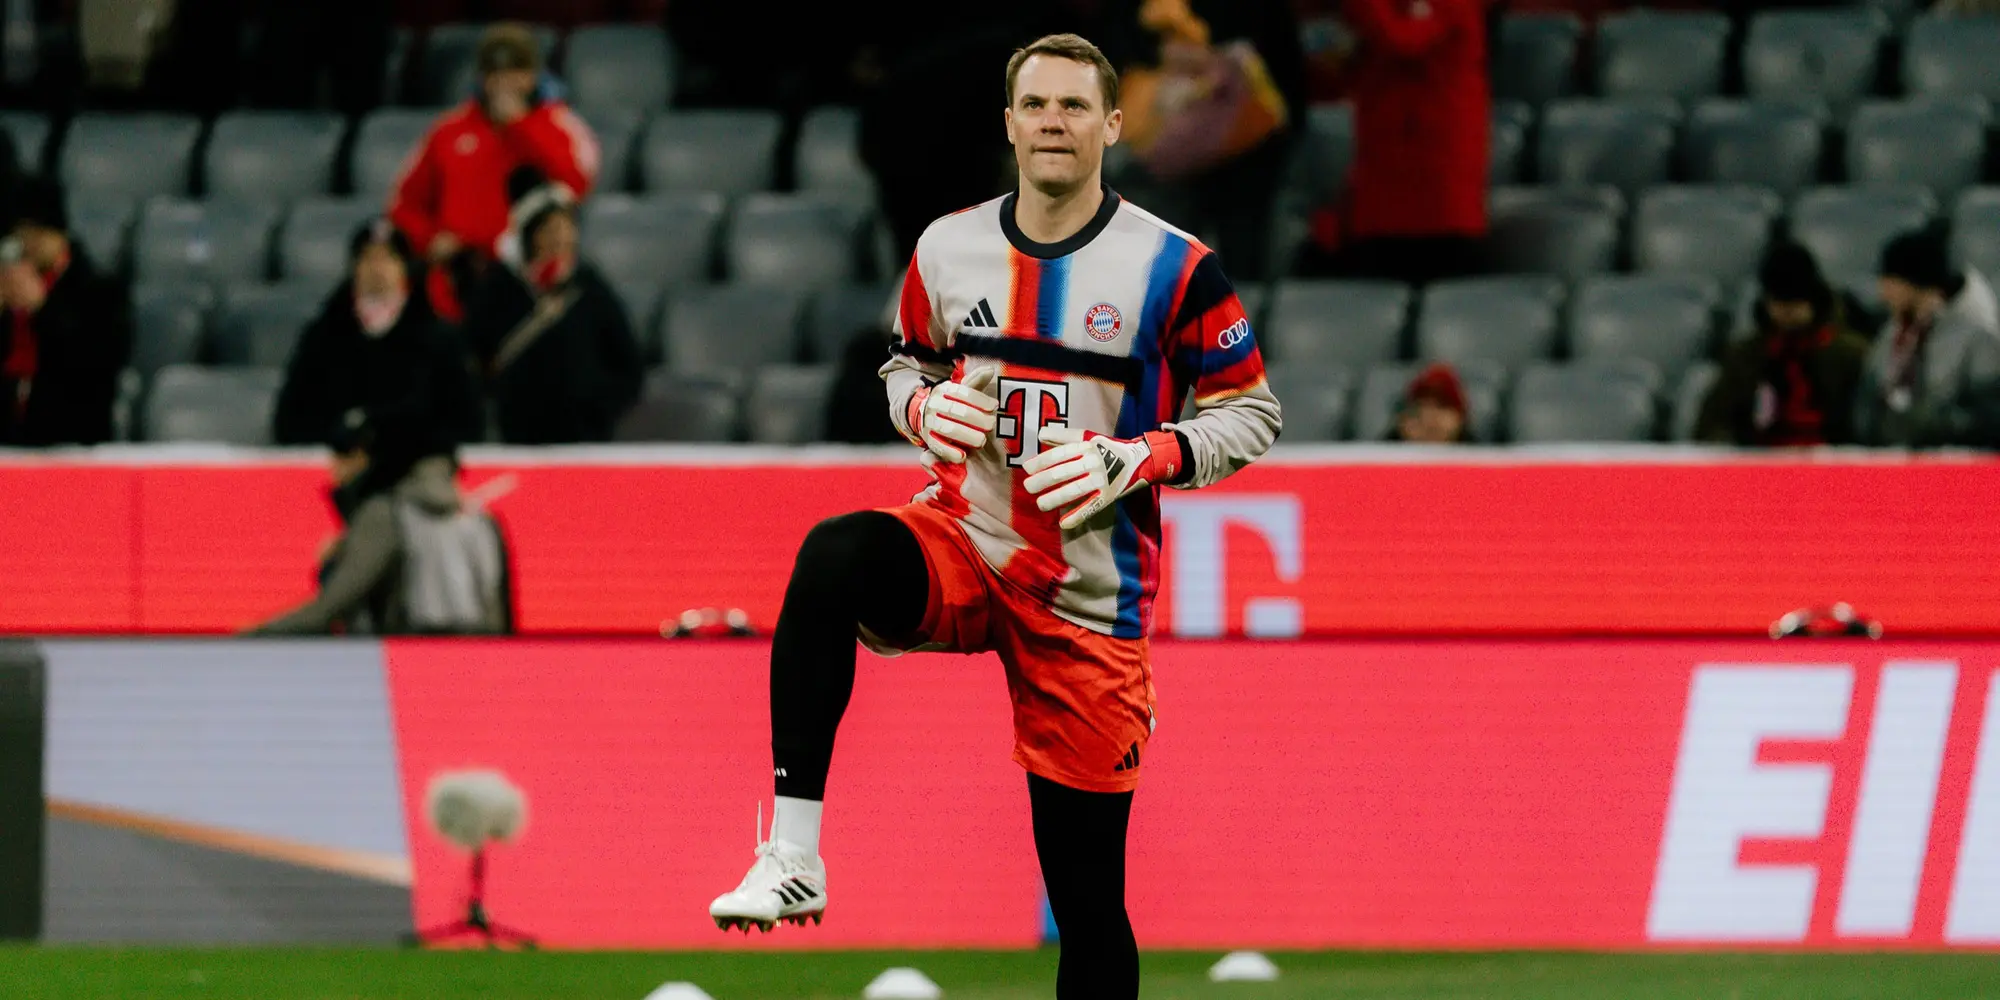
Why Athletic Training Works Differently for Goalkeepers
A field player runs many kilometers during a game. His training focuses on endurance, speed work, and pressing.
Your game is different. You have few actions, but each one is intense: jumping from a standing start, the flight phase, landing on your hips and shoulders, and getting back up immediately. In between, there are long periods of inactivity. Your body has to explode from a standing start and then absorb the impact cleanly.
A goalkeeper who runs laps is training for a game he doesn’t play.
Why this is important: For you, athleticism is both performance and insurance. The same body that jumps explosively must control the landing afterward. Anyone who only trains vertical leap and forgets about the landing is building a powerful engine without brakes.
The Four Pillars of Goalkeeper Fitness
Athleticism isn’t just about “being fit.” For goalkeepers, it consists of four interrelated components.
Explosive power. The first step and the takeoff. It’s not about how much power you have, but how quickly you can generate it. Jumps, short sprints, and explosive strength exercises are your tools here.
Core stability. Your core transfers power from your legs to your arms and hands. During the flight phase, it keeps your body straight and under control. Upon landing, it protects your lower back.
Mobility. Your hips, shoulders, and ankles need a full range of motion. You must be able to get deep into the starting position and reach out far. If you lack hip mobility, your groin and back will take on the work they aren’t designed for.
Landing and Falling. The most underrated pillar. Every block ends on the ground. If you don’t train falling as a separate skill, you’ll land on your elbows and the tips of your shoulders, week after week.
Why it works: The pillars are interdependent. An explosive takeoff will only get you further if your core keeps you stable in the air. And even the best flight phase is useless if the landing takes you out of training for three weeks.
Common Goalkeeper Injuries and How to Prevent Them
Goalkeepers get injured differently than field players. They experience fewer muscle strains from sprinting, but put more strain on their fingers, shoulders, hips, and back. The good news: You can specifically address most of these causes during training.
Fingers:
Cause: hard shots on outstretched fingers, incorrect hand position.
Prevention: proper catching technique, training grip strength, wearing the right size glove.
Shoulder:
Cause: Landing on the tip of the shoulder; overhead movements.
Prevention: Fall training; strengthening the shoulder muscles.
Groin and hips:
Causes: push-offs, explosive lateral movements, stiff hips.
Prevention: Strengthen the adductors, improve hip mobility.
Knees:
Causes: Landing after jumping for high balls, collisions.
Prevention: Landing drills, keeping the knee stable above the foot.
Lower Back:
Cause: Frequent landings, weak core.
Prevention: Core stability
Ankle:
Cause: Twisting the ankle during takeoff.
Prevention: Balance and stability exercises.
A structured warm-up is the simplest form of prevention there is.
Why this is important: If you know where your body is under the most strain, you can train specifically to strengthen those areas. And if the pain doesn’t go away after a few days, get it checked out by a doctor or physical therapist. Gritting your teeth and playing through the pain is not a sign of quality in goal.
The Most Common Mistakes in Athletic Training
Running laps instead of sprints. Endurance runs won’t make you faster off the mark. Your game thrives on short, explosive bursts of action, so train that way.
Just the takeoff, no landing. Vertical leap without proper landing technique increases the risk instead of reducing it. Every jumping exercise requires a controlled landing.
Warm up with high balls. If you start your warm-up with crosses and diving headers, you’re jumping with cold muscles. First mobilize and activate your muscles, then do jumps, then work with the ball.
Intense strength training right before the game. An intense strength session the day before the game robs you of exactly the explosiveness you need on the weekend.
Ignoring recovery. Explosive power builds during rest, not through repetition. If you keep jumping when you’re tired, you’re reinforcing poor movement patterns.
An adult-style program for young goalies. For young goalies, coordination, body weight, and proper technique take priority over additional weight training.
3 Drills for Athletic Performance and Injury Prevention
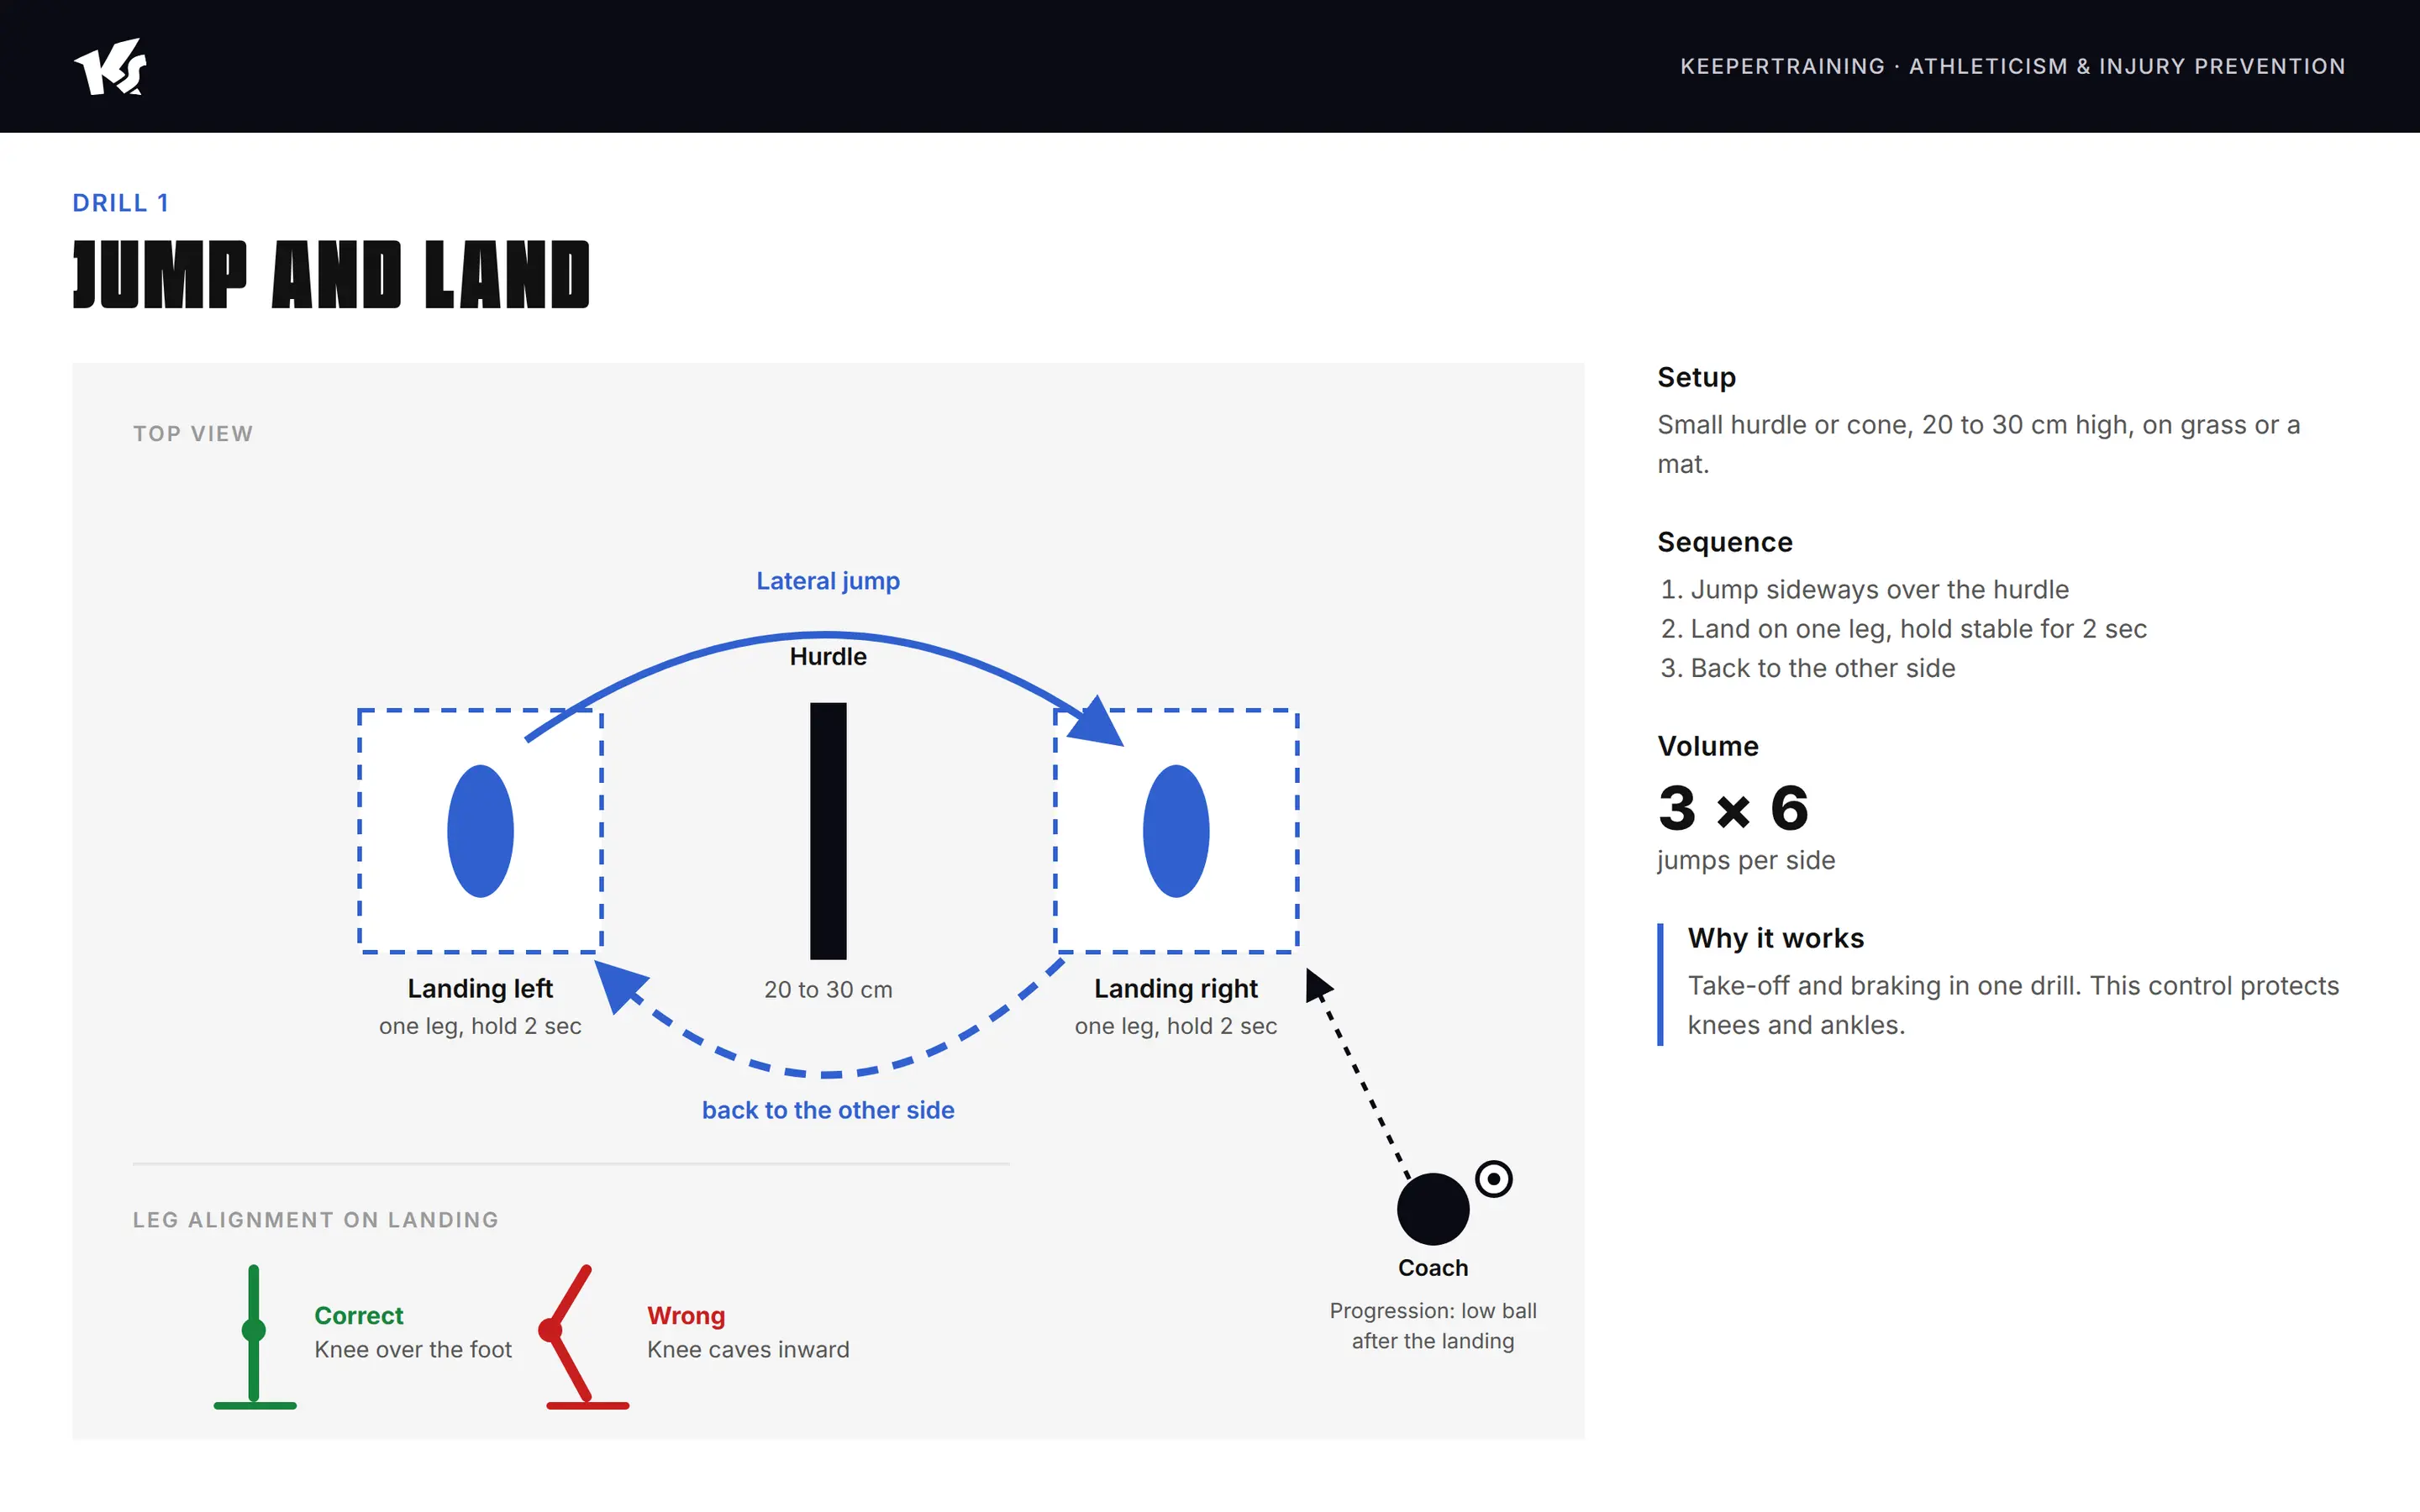
Drill 1: Jumping and Landing
Setup: A small hurdle or cone, about 20 to 30 centimeters high, on grass or a mat.
Procedure: Jump sideways over the hurdle, landing on one leg. Hold the position steadily for two seconds, keeping your knee above your foot and preventing it from caving in. Then repeat on the other side. 3 sets of 6 jumps per side.
Progression: Immediately after a stable landing, the coach passes you a low ball, which you catch cleanly.
Why it works: You’re training both takeoff and braking in a single exercise. It’s precisely this control that protects your knees and ankles when you land under pressure after jumping for a high ball.
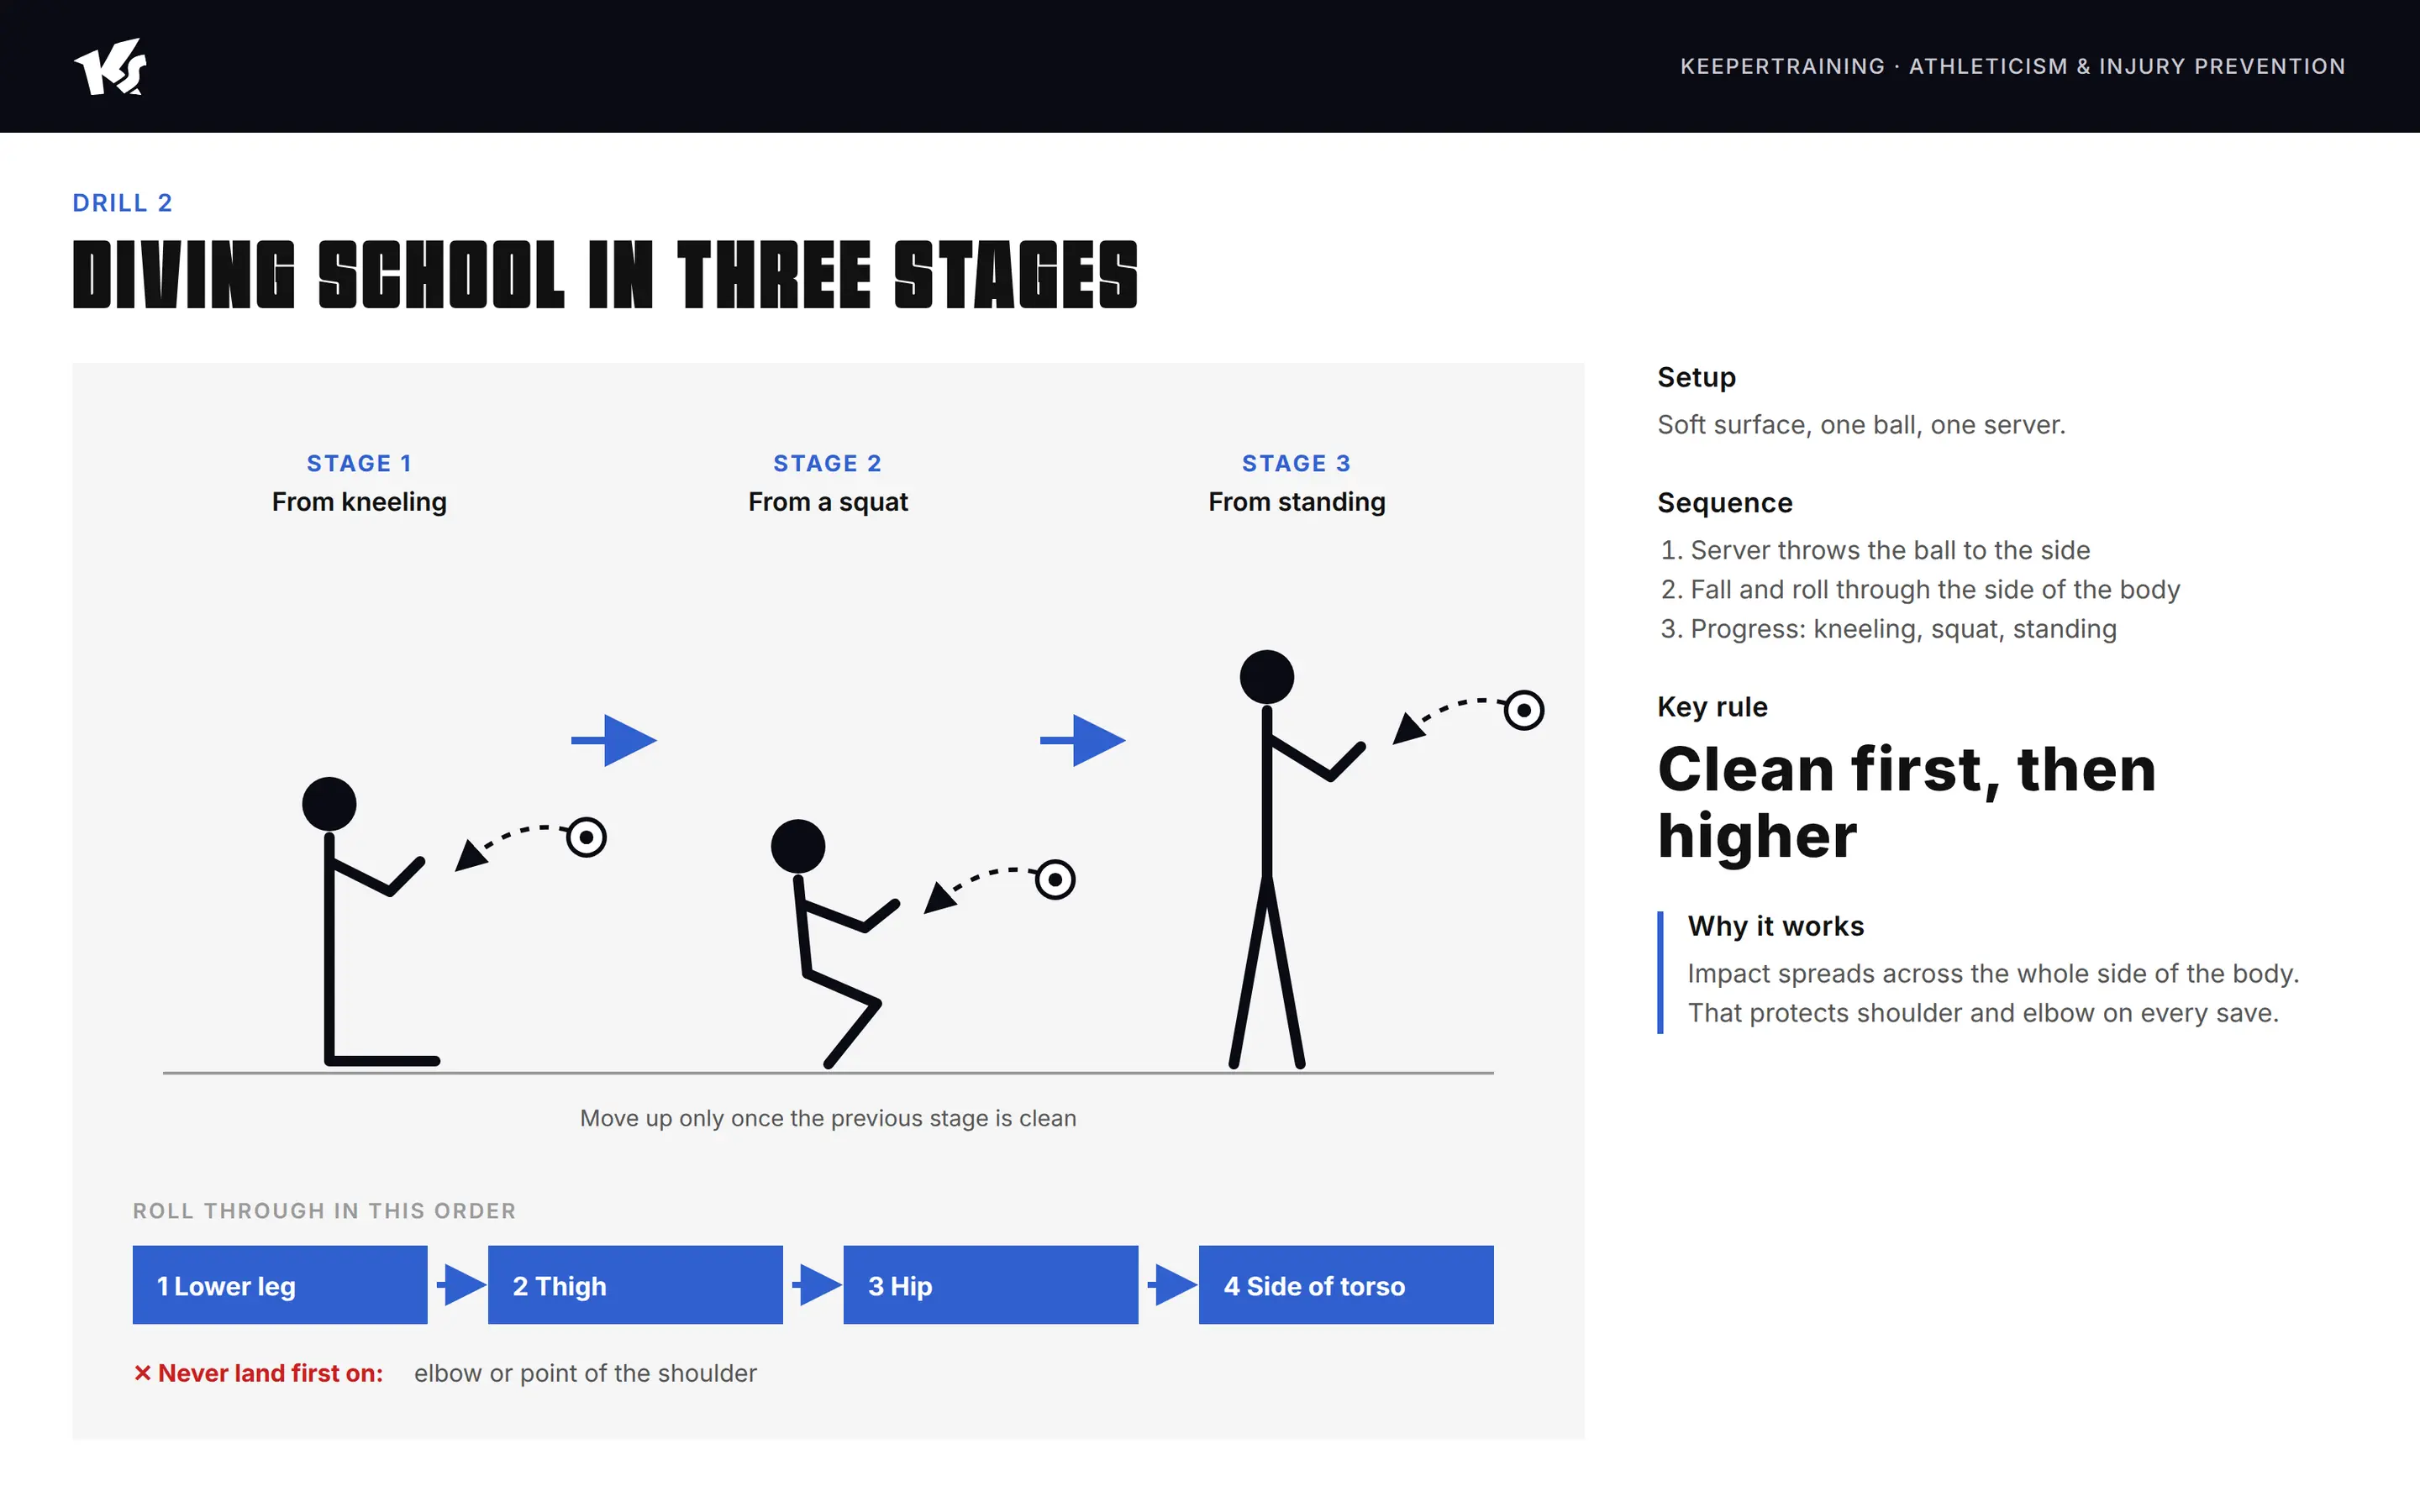
Drill 2: Falling Techniques in Three Steps
Setup: Soft surface, one ball, one partner.
Procedure: Level 1 from a kneeling position, Level 2 from a squatting position, Level 3 from a standing position. The ball is thrown from the side; you fall and roll down through your lower leg, thigh, hip, and the side of your torso. Your elbow and the tip of your shoulder should not touch the ground first. Only move on to the next level once you’ve mastered the current one.
Why it works: Falling becomes an automated technique rather than a matter of chance. Distributing the impact force across the entire side of your body protects your shoulders and elbows with every single save.
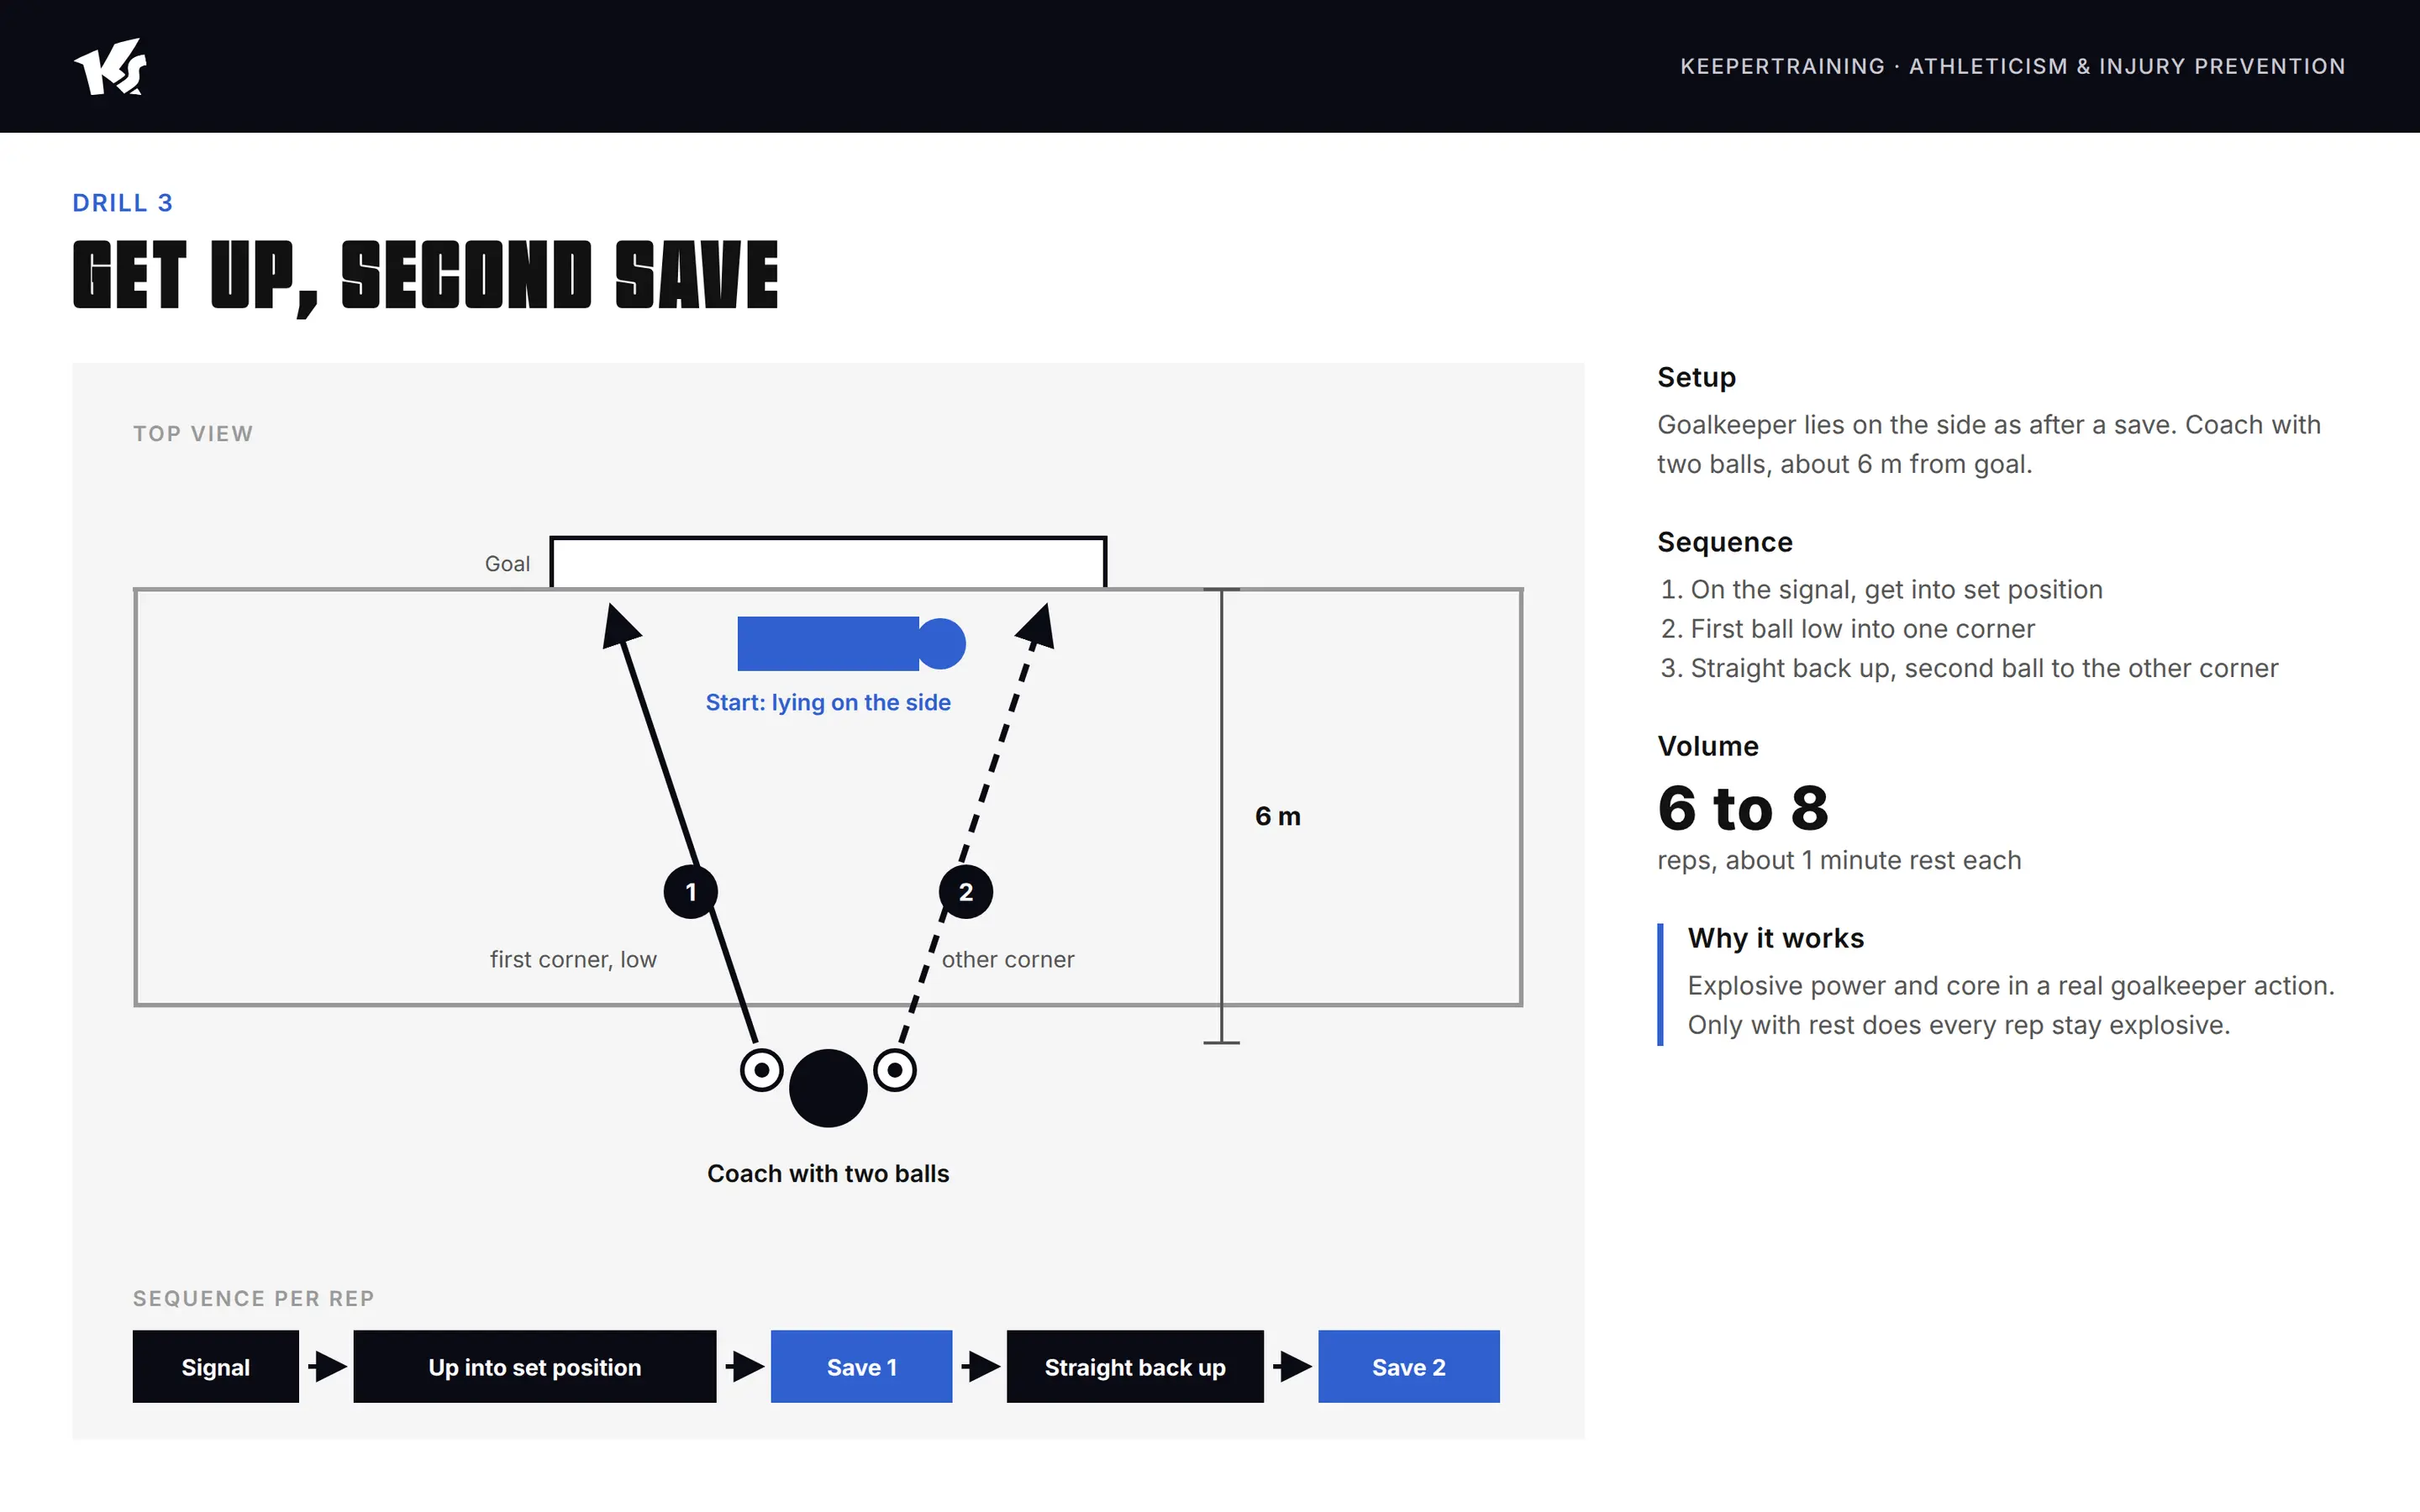
Drill 3: Get Up, Second Save
Setup: You’re lying on your side on the floor as if after a save. The coach stands about 6 meters in front of the goal with two balls.
Procedure: On the signal, get into your starting position as quickly as possible. Save the first ball low in one corner, then get back up immediately. Save the second ball in the other corner. Do 6 to 8 sets, with about a one-minute break between each set.
Why it works: Follow-up shots decide games. This drill combines explosive power and core stability with real-game goalkeeping action. The rest period isn’t a luxury: Only with proper recovery can each repetition remain explosive.
Your Athletic Checklist
✅ Practice short, explosive movements instead of running laps
✅ Finish
every jumping exercise with a controlled landing ✅ Practice falling as a separate skill, from a kneeling position to a standing
position ✅ Warm up in the correct order: mobilize, activate, jump, then balls
✅ Avoid intense strength training the day before a game; take breaks between explosive repetitions
Conclusion: The best save is the one after which you get back up
The play in the 62nd minute isn’t decided in the air. It’s decided in the weeks leading up to it—whether you’ve trained your takeoff, landing, and stability, or not.
Athletic training makes you more explosive. And it keeps you on the field. If you specifically train your vertical leap, core strength, mobility, and landing technique, you’ll jump higher, land more securely, and be ready to go again for the next ball.
Always stay up to date
Frequently Asked Questions About Athletic Training and Injury Prevention for Goalkeepers
As a goalkeeper, how often should I do athletic training?
Two to three short sessions per week are enough, each lasting 20 to 30 minutes. These can be easily incorporated into regular goalkeeper training. The most intense session should not be scheduled for the day before the game.
Do I need a gym for that?
No. Using your body weight, mini resistance bands, cones, and a small hurdle, you can cover the most important exercises. What matters most is proper form, not the weight.
At what age does athletic training become beneficial?
You can start training coordination, jumps, and landing techniques early on—in a playful way and using your own body weight. Additional weights should only be introduced once your technique is solid, and ideally under the guidance of an instructor.
What's the right way for a goalkeeper to warm up?
First, mobility exercises for the hips, shoulders, and ankles; then, core and leg activation. Next, jumps and simple falling drills; and finally, ball exercises with increasing intensity.
What should I do if I have pain in my finger, shoulder, or groin?
Take a break and don't just grit your teeth and push through it. If the pain doesn't get better after a few days, have a doctor or physical therapist check it out.